


Jet Craft Aviation Bead Breaker with Rolling Stand - JCBB-STAND-W


Need a Quote?
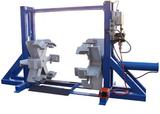
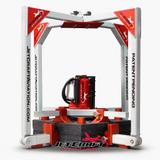
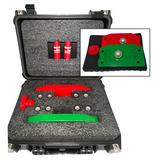
The Jet Craft Aviation JCBB-STAND-W - Bead Breaker with Rolling Stand is a universal aviation bead breaker designed to safely separate an aircraft tire bead from the wheel during wheel and tire maintenance, while also compressing tire and wheel assemblies during installation.
Availability: In Stock.
Jet Craft’s Universal Bead Breaker is built for versatility across multiple aircraft platforms, helping operators avoid stocking multiple single aircraft bead breaker tools. It is engineered to improve safety and repeatability, reduce technician effort, and support faster tire changeouts for MROs, FBOs, and private aviation operators. The same controlled bead breaking approach can also support industrial fleet and specialty vehicle maintenance teams that service heavy duty wheel and tire assemblies where controlled force and repeatable set up reduce rework.
Kit contents
- Universal bead breaker tool
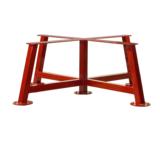
- Rolling stand for easier positioning around the hangar
- Portable, dismantlable design for transport and storage
- Hydraulic assist interface (uses shop air supply for operation)
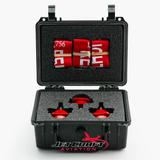
- Wheel support blocks for lower and upper crossbar positioning
- Cage arms with quick release pins for secure set up
Features and benefits
- Compatible with multiple aircraft platforms (confirm per Aircraft Maintenance Manual and Component Maintenance Manual).
- Heavy duty construction built for long term use in hangar and field environments.
- Designed to improve safety and repeatability compared to improvised bead breaking methods.
- Portable for both hangar and remote operations where a compact GSE footprint matters.
- Helps reduce technician effort and speeds up aircraft wheel and tire maintenance workflows.
- Rolling stand helps move the bead breaker between work areas with less handling.
Operating overview
This aircraft tire bead breaker uses adjustable lower and upper block sets to support different wheel diameters, then applies controlled force via a hydraulic assist. For removal, the tool separates the bead from the wheel halves. For installation, it compresses the tire and wheel assembly enough to install a retaining ring or start bolts on bolted wheel halves.
Important notes
- Before using the Jet Craft Aviation Bead Breaker, consult your specific Aircraft Maintenance Manual and or Component Maintenance Manual for all wheel and tire breakdown steps and procedures.
- Confirm the work area surface is flat and level.
- Double check cage arm fasteners and lower and upper sections for correct positioning before activating the hydraulic assist.
Why Jet Craft Aviation tooling through Pilot John International
Pilot John International supports aviation and ground support equipment programs with product selection support, responsive quoting, and worldwide shipping. Jet Craft emphasizes fast delivery with many parts stocked, U.S. made manufacturing, and precision production focused on quality and reliability, helping operators avoid typical long lead times.
Safety reminder: Always follow approved procedures, use properly rated equipment, and verify stability before applying pressure. Do not exceed the limits defined by your maintenance manuals or local safety policies.
Mid size and small cabin corporate jet wheel
Tire removal
- Remove cage arms quick release pins and rotate cage arms downward.
- Measure wheel diameter. Slide lower blocks into place evenly on the lower crossbar based on the wheel measurement. The wheel needs to lay centered on the lower crossbar (look down through the bearing hole) and make good contact on the upper step of the lower block.
- Lay wheel and tire in accordance with lower blocks. Check for proper alignment by ensuring the wheel is resting on top of all four upper steps of the lower blocks, and ensuring the lower crossbar section is centered when looking down through the bearing hole.
- Set upper cross section on top of wheel and tire, rotate cage arms upward and allow quick release pin to lock into position. In accordance with your tire diameter, slide the 4 upper crossbar blocks to the center of the tire sidewall. If the tire has a water diverting chine, upper blocks can be placed on top of the chine without damaging it.
- Set hydraulic assist on top of the upper cross section. Place the appropriate size spacer between the hydraulic jack and the top metal plate. Connect the air hose.
- Apply pressure carefully until the tire becomes separated from the upper half of the wheel.
- Release hydraulic pressure and remove hydraulic assist and spacer from the upper crossbar.
- Remove cage arm quick release pins and lower cage arms, remove upper cross section. Flip the wheel and tire assembly over to break the other side of the bead. Rotate cage arms upward and allow quick release pin to lock into position and set upper crossbar on top of the tire.
- Repeat the pressure and release steps and remove the wheel and tire assembly from the bead breaker.
Tire installation
- Remove cage arms quick release pins and rotate cage arms downward.
- Measure wheel diameter. Slide lower blocks into place evenly on the lower crossbar based on the wheel measurement. The wheel needs to lay centered on the lower crossbar (look down through the bearing hole) and make good contact on the upper step of the lower block.
- Lay wheel and tire in accordance with lower blocks. Check for proper alignment by ensuring the wheel is resting on top of all four upper steps of the lower blocks, and ensuring the lower crossbar section is centered when looking down through the bearing hole.
- Set upper cross section on top of wheel and tire, rotate cage arms upward and allow quick release pin to lock into position. In accordance with your wheel diameter, slide the 4 upper crossbar blocks to the outer edge of the wheel, ensuring a good seat and enough spacing to install the wheel retaining ring (split ring type). For bolted wheel halves, position the blocks to seat on the wheel and compress wheel halves together to start the bolts. If the wheel is too small for the upper blocks to rest on the wheel, the upper blocks can be placed in the center of the tire so the tire can be compressed enough to start bolts.
- Set hydraulic assist on top of the upper cross section and connect air hose.
- Apply pressure carefully until the tire is compressed enough to install the retaining ring on the wheel (split wheel) or bolts with nuts (bolted wheel halves).
- Release hydraulic pressure and remove hydraulic assist from the upper crossbar.
- Remove cage arms quick release pins and lower cage arms, remove upper cross section. Remove the assembled wheel and tire from the bead breaker.
Best practice tip: After breaking the bead for a particular wheel, mark the bottom block position and label it for the wheel (for example Lear 60 nose, G 550 main). This reduces set up time the next time you service that same wheel assembly.
Large cabin corporate jet wheel
Tire removal
- Remove cage arms quick release pins and rotate cage arms downward.
- Measure wheel diameter. Slide lower blocks into place evenly on the lower crossbar based on wheel measurement by adding 1 inch to the wheel measurement. The wheel needs to lay centered on the lower crossbar (look down through the bearing hole) ensuring the outer wheel diameter does not contact the block upper step.
- Lay wheel and tire in accordance with lower blocks. Check for proper alignment by making sure the lower crossbar section is centered when looking down through the bearing hole.
- Set upper cross section on top of wheel and tire, rotate cage arms upward and allow quick release pin to lock into position. In accordance with your tire diameter, slide the 4 upper crossbar blocks to the center of the tire sidewall.
- Set hydraulic assist on top of the upper cross section and connect air hose.
- Apply pressure carefully until the tire becomes separated from both the lower and upper halves of the wheel. In most cases, the lower bead will break first, then the upper bead will follow.
- Release hydraulic pressure and remove hydraulic assist from the upper crossbar.
- Remove cage arm quick release pins and lower cage arms, remove upper cross section. Remove tire from wheel.
Tire installation
- Steps 1 through 3, no changes needed. Lower blocks should already be adjusted from the removal process. Place wheel on the lower block bottom step and install the new tire on the rim.
- Set upper cross section on top of wheel and tire, rotate cage arms upward and allow quick release pin to lock into position. In accordance with your wheel diameter, slide the 4 upper crossbar blocks to the outer edge of the wheel, ensuring a good seat and enough spacing to install the wheel retaining ring (if split ring type). For bolted wheel halves, position blocks to seat on the wheel and compress wheel halves together to start the bolts.
- Set hydraulic assist on top of the upper cross section and connect air hose.
- Apply pressure carefully until the tire is compressed enough to install the retaining ring on the wheel (split wheel) or bolts with nuts (bolted wheel halves).
- Release hydraulic pressure and remove hydraulic assist from the upper crossbar.
Export & Compliance Information
- Schedule B (HTS): 8425.49.00
- ECCN: EAR99 — No export license required for most destinations
| General Information | |
|---|---|
| Part # | JCBB-STAND-W |
| Manufacturer | Jet Craft Aviation |
| Shipping Information | |
|---|---|
| Product Weight | 415 lbs. |
| Product Dimensions | 55 x 55 x 36 in. |
| Specifications | |
|---|---|
| ECCN | EAR99 |
| Product Dimensions | 55x55x36 |
| Schedule B | 8425.49.00 |
| Weight | 415lbs |
Customers also viewed
Customers who bought this item also purchased
AIRCRAFT COMPATIBILITY
This item is for use on all aircraft.
PRODUCT REVIEWS
This item does not have any reviews yet.
QUESTIONS & ANSWERS
The JCBB-STAND-W bead breaker’s rolling stand allows technicians to easily move the bead breaker tool around the hangar or shop floor without lifting or repositioning heavy components. This mobility improves workflow efficiency, especially on high-volume wheel-and-tire service days. Reducing setup time and tool handling helps keep work areas organized and safer for ground crews.
Yes! The JCBB-STAND-W is engineered as a universal aviation bead breaker capable of working with a wide range of aircraft wheel diameters when the support blocks are properly positioned. Still, technicians should verify compatibility with a specific wheel size before use, particularly on larger business jet or transport-class wheels. Proper alignment ensures safe bead separation without damaging rims.
The bead breaker connects to a shop hydraulic or pneumatic source that provides a controlled assist force to break the tire bead away from the rim. This hydraulic system reduces manual effort and ensures repeatable, even pressure application across the bead area. Using hydraulic assist improves consistency and minimizes technician fatigue when breaking tough bead seals.
Yes. The stand is designed with a wide stance and sturdy base to ensure stability even under forceful bead-breaking conditions. Locking casters help keep the unit in place during operation, preventing unwanted movement. For safety, always ensure the stand is on a level surface before applying hydraulic pressure.
The kit includes the bead breaker tool, a dedicated rolling stand, adjustable support blocks, and cage arms with quick-release pins for secure assembly. These components help position the wheel assembly properly and adapt the tool to a range of wheel configurations. Having these accessories included streamlines setup and teardown between jobs.
Yes, in addition to breaking bead seals for tire removal, this bead breaker design can also help compress wheel and tire assemblies during installation. Helping seat retaining rings or bolting wheel halves becomes more controlled and consistent with the rolling stand configuration. This dual utility increases the tool’s value in maintenance workflows.
Before operating, confirm that the area is clear of bystanders and that appropriate personal protective equipment (PPE) is worn. Ensure the wheel is centered and blocks are securely positioned before applying pressure, and always engage caster locks once the stand is in place. Controlled hydraulic force and proper alignment help mitigate risks associated with bead-breaking work.
Routine maintenance includes inspecting hydraulic connections, checking the condition of support blocks and cage arms, and verifying that the rolling stand’s casters and hardware are free from corrosion or damage. Light lubrication of moving parts helps maintain smooth movement and setup. Keeping the unit clean and storing it properly when not in use extends its service life.
Formal certification isn’t normally required, but technicians should be trained in safe bead-breaking techniques and familiar with aircraft wheel and tire servicing procedures. Reviewing the aircraft’s maintenance manual and the tool’s operating guidelines before first use helps ensure correct practice. Experience with hydraulic bead breakers improves both safety and efficiency.
The JCBB-STAND-W is ideal for hangars, maintenance shops, and MRO facilities where tire servicing is frequently required. Its mobility makes it less suited to rough outdoor surfaces but excellent on shop floors, ramps, and covered service bays. Using it in a clean, level environment maximizes performance and safety.


